


Contents
- Step 0: theoretical background about the Telegram bots API
- Step 1: Implementing Exchange Rate Requests
- Step 2: Create a Telegram Bot with @BotFather
- Step 3: Setting Up and Launching the Bot
- Step 4: Write the /start Command Handler
- Step 5: Create a /help Command Handler
- Step 6: Adding the /exchange Command Handler
- Step 7: Writing a handler for the built-in keyboard buttons
- Step 8: Implementing the Update Button Handler
- Step 9: Embedded Mode Implementation
- Conclusion
Bots in Telegram are programs that help to establish contact with the audience or simplify actions that previously had to be performed manually. These programs are written specifically for the messenger platform. Bots work in this way: the user sends a command through the input line, and the system responds with a text or interactive message. Sometimes the program even imitates the actions of a real person – such a bot inspires more trust among customers.
There are several types of systems for automatic assistance to users. Some bots just communicate with customers, others regularly provide information. It is impossible to clearly divide programs into types – developers often combine several functions in one bot.
You can write a simple bot for Telegram with interactive elements in the form of on-screen buttons in 9 steps. Let’s look at each of them in detail and answer a few questions:
- how to start a bot;
- how to register a built-in keyboard from one or more buttons;
- how to program the buttons for the desired functions;
- what is inline mode and how to set it up for an existing bot.
Step 0: theoretical background about the Telegram bots API
The main tool used to create Telegram bots is the HTML Application Programming Interface, or HTML API. This element accepts visitor requests and sends responses in the form of information. Ready-made designs simplify the work on the program. To write a bot for Telegram, you need to use this email address: https://api.telegram.org/bot
For the correct functioning of the bot, a token is also needed – a combination of characters that protects the program and opens access to it to trusted developers. Each token is unique. The string is assigned to the bot upon creation. Methods can be different: getUpdates, getChat and others. The choice of method depends on what algorithm the developers expect from the bot. Token example:
123456:ABC-DEF1234ghIkl-zyx57W2v1u123ew11
Bots use GET and POST requests. Method parameters often have to be supplemented – for example, when the sendMessage method is supposed to send the chat id and some text. Parameters for method refinement can be passed as a URL query string using application/x-www-form-urlencoded or via application-json. These methods are not suitable for downloading files. UTF-8 encoding is also required. By sending a request to the API, you can get the result in JSON format. Take a look at the program’s response to retrieving information via the getME method:
GET https://api.telegram.org/bot/getMe{ ok: true, result: { id: 231757398, first_name: "Exchange Rate Bot", username: "exchangetestbot" } }
The result will be obtained if ok equals true. Otherwise, the system will indicate an error.
There are two ways to get custom messages in bots. Both methods are effective, but are suitable in different cases. To get messages, you can manually write a request with the getUpdates method – the program will display the Update data array on the screen. Requests must be sent regularly, after analyzing each array, sending is repeated. Offset is a parameter that determines the number of skipped records before loading a new result to avoid the reappearance of checked objects. The benefits of the getUpdates method will come into play if:
- there is no way to configure HTTPS;
- complex scripting languages are used;
- the bot server changes from time to time;
- the bot is loaded with users.
The second method that can be written to receive user messages is setWebhook. It is used once, no need to constantly send new requests. The webhook sends data updates to the specified URL. This method requires an SSL certificate. Webhook will be useful in these cases:
- web programming languages are used;
- the bot is not overloaded, there are not too many users;
- the server does not change, the program remains on the same server for a long time.
In further instructions, we will use getUpdates.
The @BotFather Telegram service is designed to create chat bots. Basic settings are also set through this system – BotFather will help you make a description, put a profile photo, add support tools. Libraries – sets of HTML requests for Telegram bots – are available on the Internet, there are quite a lot of them. When creating the example program, pyTelegramBotApi was used.
Step 1: Implementing Exchange Rate Requests
First you need to write the code that performs queries. We will use when writing the PrivatBank API, below is a link to it: https://api.privatbank.ua/p24api/pubinfo?json&exchange&coursid=5. You need to use these methods in your code:
- load_exchange – finds exchange rates and displays encoded information;
- get_exchange – displays data about a specific currency;
- get_exchanges – shows the listing of currencies according to the sample.
As a result, the code in the pb.py file looks like this:
import re import requests import json URL = 'https://api.privatbank.ua/p24api/pubinfo?json&exchange&coursid=5' def load_exchange(): return json.loads(requests.get(URL).text) def get_exchange(ccy_key): for exc in load_exchange(): if ccy_key == exc['ccy']: return exc return False def get_exchanges(ccy_pattern): result = [] ccy_pattern = re.escape(ccy_pattern) + '.*' for exc in load_exchange(): if re.match(ccy_pattern, exc['ccy'], re.IGNORECASE) is not None: result.append(exc) return result
The program can issue the following response to the specified requests:
[ { ccy:"USD", base_ccy:"UAH", buy:"25.90000", sale:"26.25000" }, { ccy:"EUR", base_ccy:"UAH", buy:"29.10000", sale:"29.85000" }, { ccy:"RUR", base_ccy:"UAH", buy:"0.37800", sale:"0.41800" }, { ccy:"BTC", base_ccy:"USD", buy:"11220.0384", sale:"12401.0950" } ]Step 2: Create a Telegram Bot with @BotFather
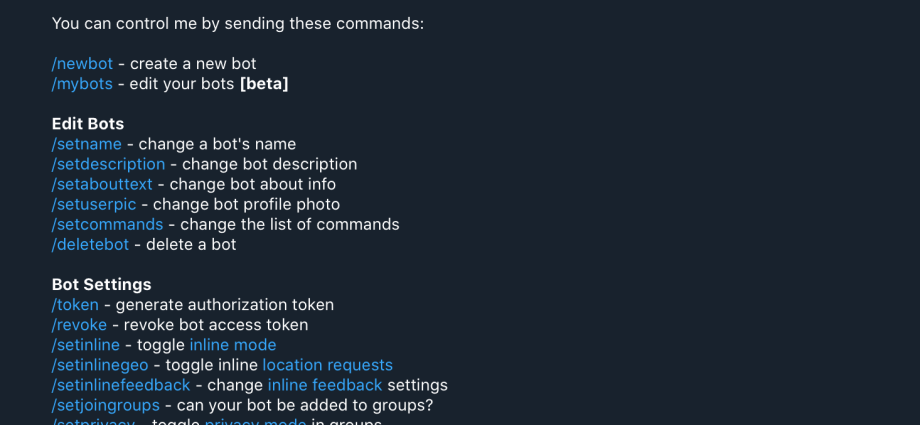
You can create a program for receiving messages and responding to them using the @BotFather service. Go to his Telegram page and enter the /newbot command. Instructions will appear in the chat, according to which you need to write down the name of the bot first, and then its address. When the bot account is created, a welcome message containing a token will appear on the screen. For further configuration, use these commands:
- /setdescription – description;
- /setabouttext – information about the new bot;
- /setuserpic – profile photo;
- /setinline – inline mode;
- /setcommands – description of commands.
At the last configuration step, we describe /help and /exchange. When all the steps have been completed, it’s time to move on to coding.
Step 3: Setting Up and Launching the Bot
Let’s create a config.py file. In it, you need to specify the unique bot code and the time zone in which the program will find information.
TOKEN = '' # replace with your bot's tokenTIMEZONE = 'Europe/Kiev' TIMEZONE_COMMON_NAME = 'Kiev'
Next, we create another file with the import of the previously written pb.py, libraries and other necessary components. The missing libraries are installed from the package management system (pip).
import telebotimport configimport pbimport datetimeimport pytzimport jsonimport traceback P_TIMEZONE = pytz.timezone(config.TIMEZONE) TIMEZONE_COMMON_NAME = config.TIMEZONE_COMMON_NAME
Let’s use the content of pyTelegramBotApi to create a bot. We send the received token using the following code:
bot = telebot.TeleBot(config.TOKEN) bot.polling(none_stop=True)
The none_stop parameter ensures that requests are constantly sent. The operation of the parameter will not be affected by method errors.
Step 4: Write the /start Command Handler
If all the previous steps are done correctly, the bot has started working. The program generates requests regularly because it uses the getUpdates method. Before the line with the none_stop element, we need a piece of code that processes the /start command:
@bot.message_handler(commands=['start']) def start_command(message): bot.send_message( message.chat.id, 'Greetings! I can show you exchange rates.n' + 'To get the exchange rates press /exchange.n' + 'To get help press /help.' )
RџSЂRё commands=[‘start’] equal to True start_command is called. The content of the message goes there. Next, you need to implement the send function_message in relation to a particular message.
Step 5: Create a /help Command Handler
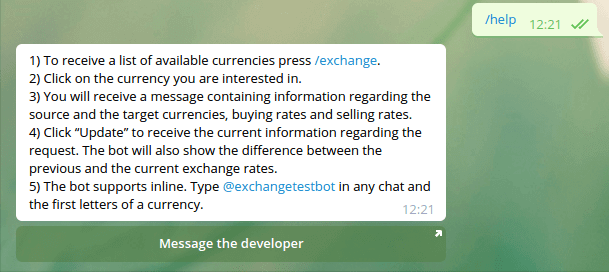
The /help command can be implemented as a button. By clicking on it, the user will be taken to the developer’s Telegram account. Give the button a name, such as “Ask the developer”. Set the reply_markup parameter, which redirects the user to a link, for the send_message method. Let’s write in the code the parameter that creates the keyboard (InlineKeyboardMarkup). You only need one button (InlineKeyboardButton).
The final command handler code looks like this:
@bot.message_handler(commands=['help']) def help_command(message): keyboard = telebot.types.InlineKeyboardMarkup() keyboard.add( telebot.types.InlineKeyboardButton( 'Ask the developer', url='ваша ссылка на профиль' ) ) bot.send_message( message.chat.id, '1) To receive a list of available currencies press /exchange.n' + '2) Click on the currency you are interested in.n' + '3) You will receive a message containing information regarding the source and the target currencies, ' + 'buying rates and selling rates.n' + '4) Click “Update” to receive the current information regarding the request. ' + 'The bot will also show the difference between the previous and the current exchange rates.n' + '5) The bot supports inline. Type @in any chat and the first letters of a currency.', reply_markup=keyboard )
Code action in Telegram chat:
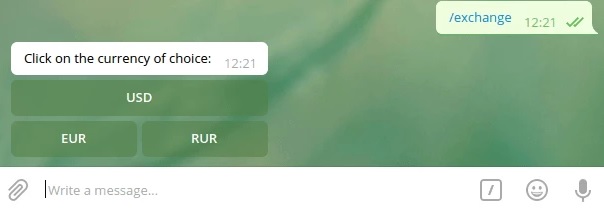
Step 6: Adding the /exchange Command Handler
This step is needed to display buttons with symbols of available currencies in the chat. An on-screen keyboard with options will help you avoid mistakes. PrivatBank provides information on the ruble, dollar and euro. The InlineKeyboardButton option works like this:
- The user clicks on the button with the desired designation.
- getUpdates receives a callback (CallbackQuery).
- It becomes known how to handle pressing the keyboard – information about the pressed button is transmitted.
/exchange handler code:
@bot.message_handler(commands=['exchange']) def exchange_command(message): keyboard = telebot.types.InlineKeyboardMarkup() keyboard.row( telebot.types.InlineKeyboardButton('USD', callback_data='get-USD') ) keyboard.row( telebot.types.InlineKeyboardButton('EUR', callback_data='get-EUR'), telebot.types.InlineKeyboardButton('RUR', callback_data='get-RUR') ) bot.send_message( message.chat.id, 'Click on the currency of choice:', reply_markup=keyboard )The result of the code in Telegram:
The pyTelegramBot Api package contains the @bot.callback_query_handler decorator function. This component is designed to translate the callback into a function – the API unwraps and re-creates the call. It is spelled like this:
@bot.callback_query_handler(func=lambda call: True) def iq_callback(query): data = query.data if data.startswith('get-'): get_ex_callback(query)Let’s also write the get_ex_callback method:
def get_ex_callback(query): bot.answer_callback_query(query.id) send_exchange_result(query.message, query.data[4:])
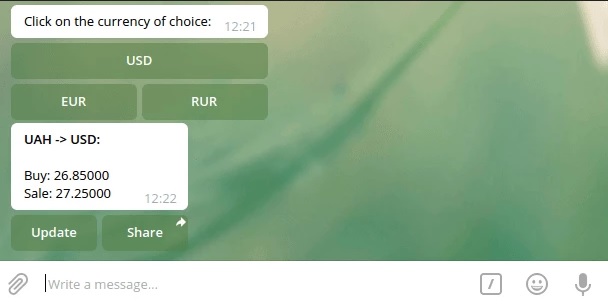
There is another useful method – answer_callback_query. It helps to remove the load between pressing the button and displaying the result on the screen. You can send a message to send_exchange_query by passing some currency code and Message. Let’s write send_exchange_result:
def send_exchange_result(message, ex_code): bot.send_chat_action(message.chat.id, 'typing') ex = pb.get_exchange(ex_code) bot.send_message( message.chat.id, serialize_ex(ex), reply_markup=get_update_keyboard(ex), parse_mode='HTML' )
While the chatbot receives the result of the request from the bank API, the visitor sees the inscription “typing a message”. It looks like a real person is answering. To display such an indicator on the screen, you will need to add input status lines. Next, we will use get_exchange – with its help, the program will receive the currency designation (rubles, euros or dollars). send_message uses additional methods: serialize_ex converts the currency to another format, and get_update_keyboard sets up softkeys that update information and send currency market data to other chats.
Let’s write the code for get_update_keyboard. Two buttons need to be mentioned – t and e stand for type and exchange. The switch_inline_query item for the Share button is needed so that the user can choose from several chats. The visitor will be able to choose to whom to send the current exchange rate of the dollar, ruble or euro.
def get_update_keyboard(ex): keyboard = telebot.types.InlineKeyboardMarkup() keyboard.row( telebot.types.InlineKeyboardButton( 'Update', callback_data=json.dumps({ 't': 'u', 'e': { 'b': ex['buy'], 's': ex['sale'], 'c': ex['ccy'] } }).replace(' ', '') ), telebot.types.InlineKeyboardButton('Share', switch_inline_query=ex['ccy']) ) return keyboardSometimes you need to see How long the exchange rate has changed in a short time. Let’s write two methods for the Update button so that users can see courses in comparison.
The difference between the exchange rates is passed to the serializer via the diff parameter.
The prescribed methods work only after the data is updated, they will not affect the first display of the course.
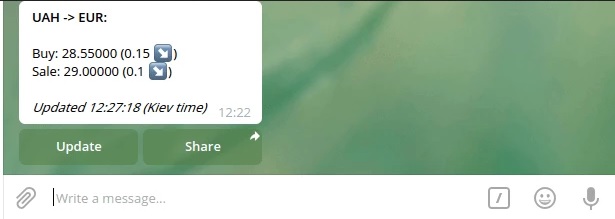
def serialize_ex(ex_json, diff=None): result = '' + ex_json['base_ccy'] + ' -> ' + ex_json['ccy'] + ':nn' + 'Buy: ' + ex_json['buy'] if diff: result += ' ' + serialize_exchange_diff(diff['buy_diff']) + 'n' + 'Sell: ' + ex_json['sale'] + ' ' + serialize_exchange_diff(diff['sale_diff']) + 'n' else: result += 'nSell: ' + ex_json['sale'] + 'n' return result def serialize_exchange_diff(diff): result = '' if diff > 0: result = '(' + str(diff) + ' " src="https://s.w.org/images/core/emoji/2.3/svg/2197.svg">" src="https://s.w.org/images/core/emoji/72x72/2197.png">" src="https://s.w.org/images/core/emoji/72x72/2197.png">)' elif diff < 0: result = '(' + str(diff)[1:] + ' " src="https://s.w.org/images/core/emoji/2.3/svg/2198.svg">" src="https://s.w.org/images/core/emoji/72x72/2198.png">" src="https://s.w.org/images/core/emoji/72x72/2198.png">)' return resultImagine that the visitor wanted to know the dollar exchange rate. Here’s what happens if you select USD in the message:
Step 8: Implementing the Update Button Handler
Let’s write the code for handling actions with the Update button and add the iq_callback_method part to it. When program items begin with the get parameter, you must write get_ex_callback. In other situations, we parse JSON and try to get the key t.
@bot.callback_query_handler(func=lambda call: True) def iq_callback(query): data = query.data if data.startswith('get-'): get_ex_callback(query) else: try: if json.loads(data)['t'] == 'u': edit_message_callback(query) except ValueError: passIf t equals u, you will need to write a program for the edit_message_callback method. Let’s break down this process step by step:
- Downloading up-to-date information about the state of the currency market (exchange_now = pb.get_exchange(data[‘c’]).
- Writing a new message through a serializer with diff.
- Adding a signature (get_edited_signature).
If the initial message does not change, call the edit_message_text method.
def edit_message_callback(query): data = json.loads(query.data)['e'] exchange_now = pb.get_exchange(data['c']) text = serialize_ex( exchange_now, get_exchange_diff( get_ex_from_iq_data(data), exchange_now ) ) + 'n' + get_edited_signature() if query.message: bot.edit_message_text( text, query.message.chat.id, query.message.message_id, reply_markup=get_update_keyboard(exchange_now), parse_mode='HTML' ) elif query.inline_message_id: bot.edit_message_text( text, inline_message_id=query.inline_message_id, reply_markup=get_update_keyboard(exchange_now), parse_mode='HTML' )
Let’s write the get_ex_from_iq_data method to parse JSON:
def get_ex_from_iq_data(exc_json): return { 'buy': exc_json['b'], 'sale': exc_json['s'] }You will need a few more methods: for example, get_exchange_diff, which reads the old and new information about the cost of currencies and displays the difference.
def get_exchange_diff(last, now): return { 'sale_diff': float("%.6f" % (float(now['sale']) - float(last['sale']))), 'buy_diff': float("%.6f" % (float(now['buy']) - float(last['buy']))) }The last one, get_edited_signature, shows the time the course was last updated.
def get_edited_signature(): return 'Updated ' + str(datetime.datetime.now(P_TIMEZONE).strftime('%H:%M:%S')) + ' (' + TIMEZONE_COMMON_NAME + ')'As a result, the updated message from the bot with a stable exchange rate looks like this:

When the course changes, the differences between the values are displayed in the message due to the prescribed parameters.
Step 9: Embedded Mode Implementation
The built-in mode is needed to quickly send information from the program to any chat – now you do not need to add a bot to the conversation as a participant. When a Telegram user enters a bot name with an @ sign in front of it, conversion options should appear above the input line. If you click on one of the items, the bot will send a message to the conversation with the results and buttons for updating and sending data. The sender’s name will contain the caption “via
InlineQuery is passed to query_text via the library. The code uses the answer_line function to retrieve the search results as an array of data and the inline_query_id element. We use get_exchanges so that the bot finds several currencies on request.
@bot.inline_handler(func=lambda query: True) def query_text(inline_query): bot.answer_inline_query( inline_query.id, get_iq_articles(pb.get_exchanges(inline_query.query)) )
We pass an array of data to get_iq_articles in order to return objects from InlineQueryResultArticle through this method.
def get_iq_articles(exchanges): result = [] for exc in exchanges: result.append( telebot.types.InlineQueryResultArticle( id=exc['ccy'], title=exc['ccy'], input_message_content=telebot.types.InputTextMessageContent( serialize_ex(exc), parse_mode='HTML' ), reply_markup=get_update_keyboard(exc), description='Convert ' + exc['base_ccy'] + ' -> ' + exc['ccy'], thumb_height=1 ) ) return result
Now, if you write @
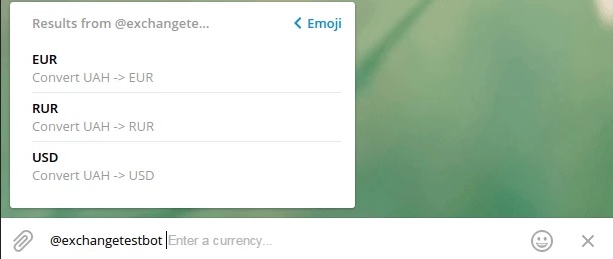
Users can filter the results by entering the desired currency.
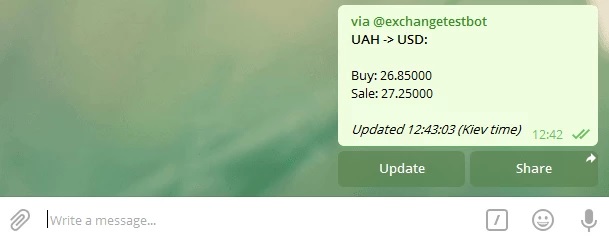
After clicking on the desired currency from the list, the chat receives the same message that bot users receive. You can also use the Update button. The image below shows the updated message sent via the bot:
Conclusion
Now you know how to create a bot for Telegram. You can add useful tools to your program: buttons for updating and sending the result to other users of the messenger and a built-in mode that allows you to use the functions of the bot outside the chat with it. Based on this instruction, you can create any simple bot with other functions – not only the one that will show exchange rates. Don’t be afraid to experiment with libraries, APIs, and code to create an automated assistant that will chat with customers on Telegram and strengthen the connection of interested people with the company.
Fantástica publicación